How to take the Backup of Gmail account?
I still remember the day on which Google’s popular mail program Gmail became unavailable for a few hours, and it created much panic through out the world. Normally for people like me, Gmail is the best email service provider and we rely on them completely. That day I thought what would happen if suddenly due to any problem my Gmail account will be deleted? Or due to any server error I will lost all the data of my Gmail account?
For me the data stored in my Gmail account is much precious and I will never thought about to lose them. Also, I am sure (especially after seeing the panic through out the world, which the Gmail Blackout created) that I am not alone to think about the same. There are billions of people who are using Gmail and they will never want to lose the data which is there in their Gmail account. Now the big question is How to take the Backup of Gmail account?
The best way of taking the back up of your Gmail account is to download all the mails on your system with the help of Outlook. I will recommend Microsoft Outlook for this as the Outlook Recovery is quite easier, in case you delete some thing unwillingly from your system. Although I am not that much expert who can explain how we can undelete the mails which we deleted from Microsoft Outlook, though I know probably it is possible. (Next time I will research on the same).
The very first step required to take the back up of Gmail account is to enable the POP access in your Gmail account. For this you need to go to the Settings in your Gmail account which is there at the right hand side of the top of the Gmail account. Then you need to go to the Forwarding and POP/IMAP tab. Here in the POP Download section you need to click on Enable POP for all mail (even mail that’s already been downloaded). Now don’t forget to click on Save Changes option at the bottom of the page. Once this is done, now you can download all the mails of your Gmail account, except the sent items mails.
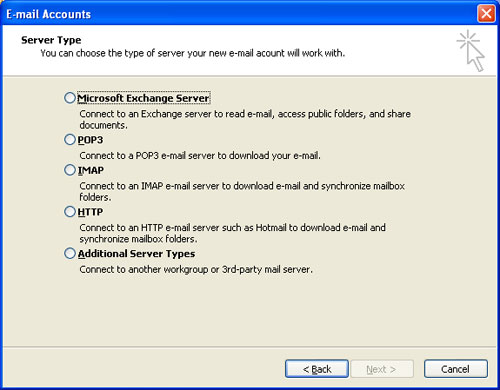
The next step is to open Microsoft Outlook. Next step is to go to the Tools menu and select the Email Accounts. A window like this will open:
Make sure that Add a new e-mail account is remain selected, now press Next and a new window will open:
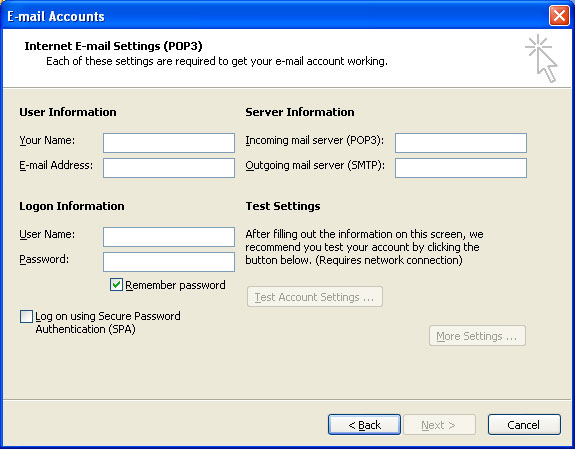
Select the POP3 option now and then click on Next. A new window will come:
Now you need to fill up the Name, E-mail Address as per your account. In the Server Information field please enter these details:
Incoming mail server (POP3): pop.gmail.com
Outgoing mail server (SMTP): smtp.gmail.com
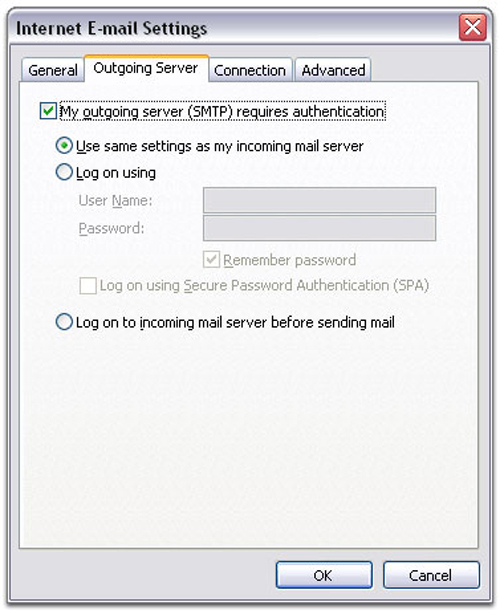
Now enter your username including the @gmail.com part and enter the password and then click on More Settings. Now please click on the Outgoing Server tab and on the check box in front of My Outgoing Server (SMTP) requires authentication and then select the option of Use same settings as my incoming mail server.
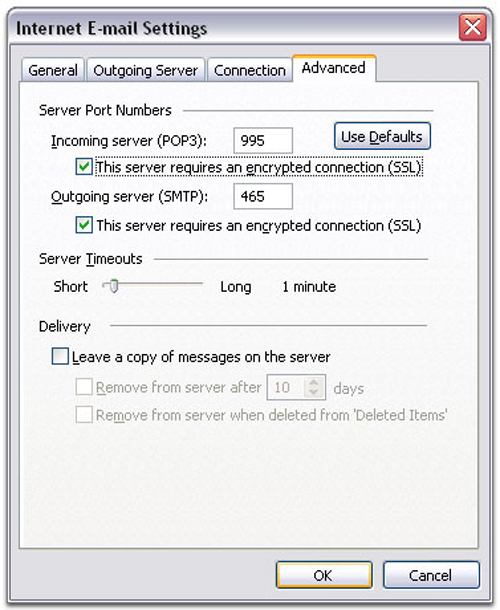
Now you are almost done, Click on the Advanced tab and you will see a check box in front of This server requires an encrypted connection (SSL) under the option Incoming Server (POP3). Please select the check box as this image is showing:
Also remember to click on the check box of This server requires an encrypted connection (SSL) under Outgoing Server (SMTP). Do remember to check if the value of the box near to Incoming Server (POP3) is 995 and Outgoing server (SMTP) is 465.
Click on OK, and Next. Please remember not to click on the check box of Log on using Secure Password Authentication (SPA). Now all the mails from your Gmail account will come to your system in a very manner. For more information about configuring Microsoft Outlook 2003 you can also click here.


